Not until you have your own dance dress, embelished with glittering rhinestones you can consider yourself a real tournament dancer – that at least was how I felt. And as I know that I am not the only one who feels that way, I would like to dedicate today’s blog to this subject.
As we know nothing in life is free – and certainly not these pretty little crystal stones: One pack of 1,440 will easily amount to about 100 €. On top of this investment you’ll be spending hours amd hours creationg your design. And when something goes wrong it can easily amount to a minor desaster. Therfore I’d like to give you a few pieces of advice to make sure that things work out well for you. You have the choice between two methods about which you can also read more on Swarovski’s website.
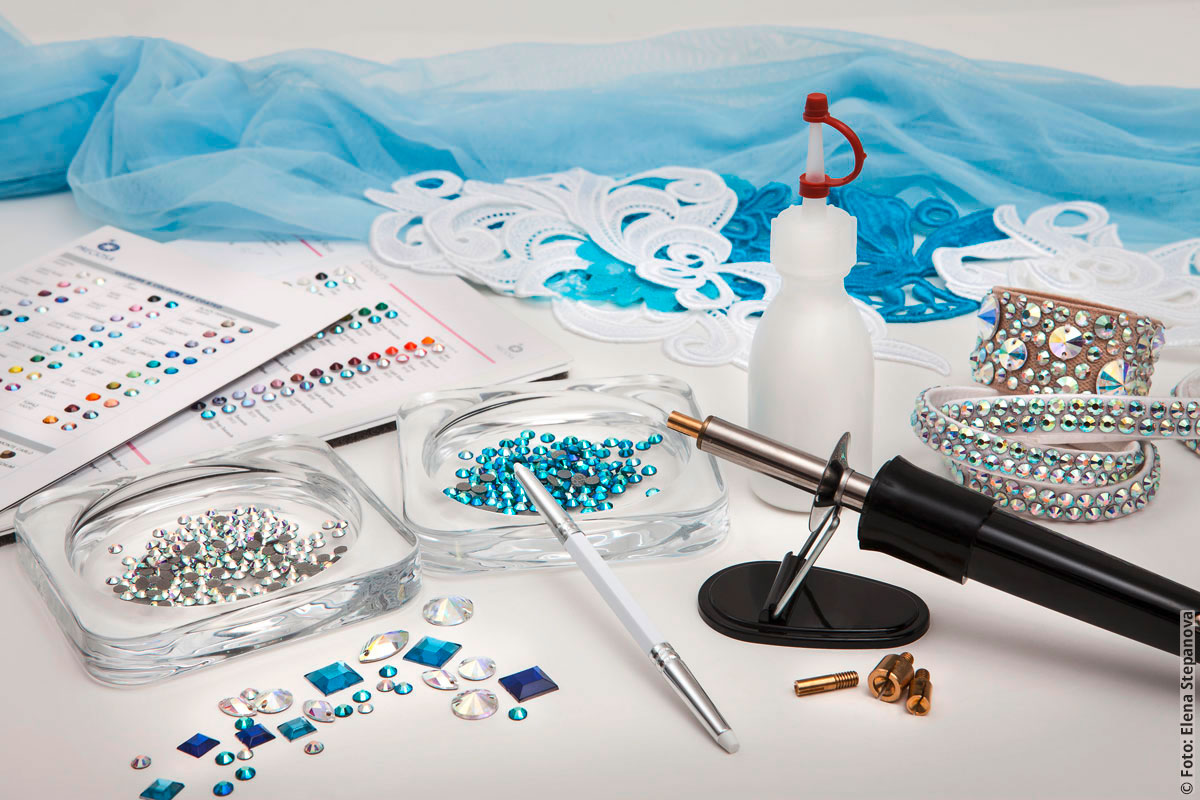
- Gluing them on
As this is a fast and reliable method it is also usually the first choice of most costume makers. Every designer usually has his own favourite adhesive, sometimes even their own brand. But the basic principle is always the same: At first the glue is white; when it sets it turns transparent and stays flexible which, when stretch fabrics are used, is extremely important. Swarovski recommends the one made by Chrisanne Clover. However, this adhesive is softened up by moisture, e.g. through transpiration or simply washing your dress. So when cleaning your dancewear it should be done quickly and without rubbing, or else your precious stones that you spent so many hours applying, may come off. In the anglophone world the industrial adhesive E6000 is especially popular. But you are well advised to handle this product with great care: It certainly does ensure that your crystals stay in place, but it also contains chemical irritants so it should only be used in well ventilated rooms. Any contact with skin or eyes should be avoided; so E6000 is best used where much wear and tear is to be expected – like on your shoes.
Practical advice: This is how you do it
Before you start you should check if the fabric is water repellant. Sprinkle a few drops of water on the tissue, then wait and watch for a while. If the water roll off in droplets no adhesive will stick. Washing it may help dissolve the water repellant coating. If the water seeps into the fabric, so will the glue and you can get started! Now one more piece of advice beforehand: If you are aiming for more elaborate decorations, arrange the crystals on the fabric before you start gluing them on. Then you have the opportunity to see if you really like it that way or if you want to make any changes.
But let’s get started: At first you place the garment of your choice on an even surface, so that the adhesive cannot disperse during the process. Put some sort of underlay under it – tin foil or cellulose film will do fine – and stroke the fabric even. This prevents an undesired unification of the front and back part of your dress if some glue makes it through the fabric. Now add tiny drops of glue on the fabric where you want to place the crystals. The easiest way to do that is to use the special bottles that have a pointed tip. And don’t be stingy with it: It is no problem that the some of the adhesive comes along the fringes – it is going to turn transparent anyway. Novices use tweezers to position the stones. The more experienced know that it works better with a sharp toothpick or wooden pike with a bit of bee wax or similar on the point. Now the crystals are pressed lightly on to the droplets of glue and left to set for about an hour. The garment may then be moved, but not yet worn as the adhesive needs 24 hours to reach its full strength.
Emergency procedures: Sometimes you don’t only get glue on the flat surface of your stone, but on the face part of it. No problem if you act while it is still fluid. You can remove it with an alkohol based solvent. After it hardens, it is too late.